
How To Make Easy Skeleton Leaves – Without Chemical
I remember I made skeleton leaves when I was little, I can’t remember how old I was but as I recall, I read it on a kid’s magazine on how to make skeleton leaves. Since it was a kid’s crafting project, it does not use any chemical to do it. It’s so easy and natural. It’s just depending on natural decaying process of the leaves. Well, maybe you will struggle with the smell that coming from the decay process, but it’s surely safe as long as you wash your hands afterward.
So, let’s go through the Skeleton leaves making process without chemical, step by step :
- Pick some fresh leaves, you can use leaves with tough skeleton but thin / soft skin, such maple leaf, oak leaf, soursop leaf, bodhi leaf etc. I found this soursop leaves on supermarket, so I used it for my skeleton-leaves project. Though I’m still aiming for bodhi leaf, I love the shape.
- Soak the leaves entirely in a plain water on a bucket. Some suggests rain water for fast decay, but I just simply get the water from tap.
- Leave it for couple of weeks.
- The natural decay process would not have a same time for each leaf. So, check for leaves that already turned color into yellowish. Pick those yellowish decayed leaves and brush it gently to remove the leaf skin and leave the network of veins (skeleton) intact. Brush until no more skin left. By the way, it’s going to smell really bad, so you better cover your nose with face mask if you can not handle the decay smell.
- After you finished with the brushing, rinse the skeleton gently until it’s clean. Some leaf may not be perfectly clean, do to some error or whatever during the soaking process, but I will keep it anyway because I still can use it and cover the defected area with something pretty.
- After rinsing, I wash it one leaf by one leaf with foaming soap to get rid of bacteria if any. But do it gently.
- Then lay the wet skeleton leaves on the paper towel and let dry for a while.
- When it’s dry, not perfectly dry, just dry enough, you can put it one by one on the book’s pages and press it for couple of hours. This is to make sure the leaves to be completely dry and keep the leaves straight.
- Check your skeleton leaves, if it’s dry and straight then it’s finished!

Easy and no chemical involved! I choose it that way, since I’m a little bit scare to play with chemical :), so I rather hold my breath brushing those stinky leaves.
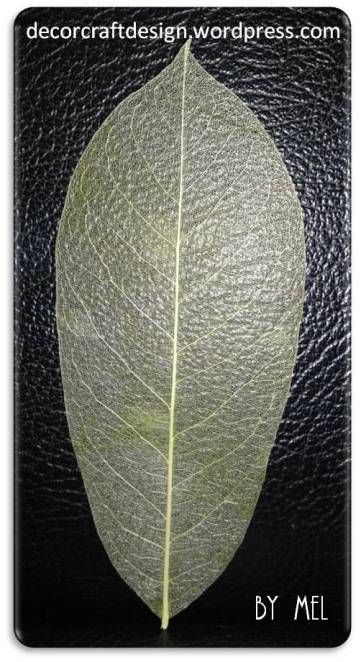
![]()
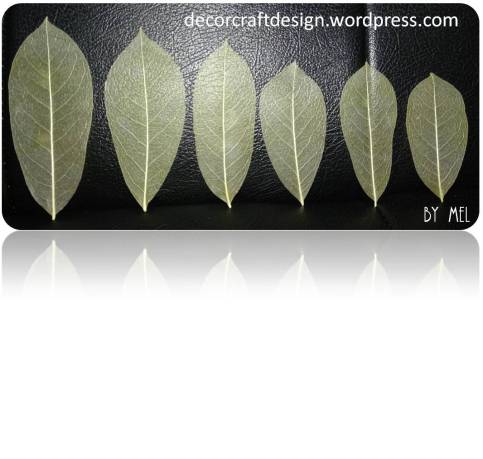

Well, now I got my skeleton leaves that I can use for lots of crafting and decorating purposes! Fun, fun, fun! Wanna give it a try? Try it out yourself and then follow me for how to make use of those skeleton leaves for diys, crafts and decors! Especially for this coming fall season, it’s great to have ideas for cheap and easy diy fall decorations and crafts!
See you later!
Creativity, love it, don’t leave it!
Mel

These are so pretty. I wish I could make these, but my allergies will not allow it. 😭🍁🍂🍁 So I will just have to enjoy yours. Thank you so much for sharing. I am eager to see how you use these. 😊
Debra
stylewisebydebra.net
LikeLike
Very cool!
LikeLike
Ohhh! wonderful! I will be making some as bookmarks 😀 I really like that there is no need for chemicals
LikeLiked by 1 person
Great!! So happy you found it useful. Yeah, no chemical, but be ready with the smell 🙂 Thanks Alicia!
LikeLiked by 1 person
Beautiful! They look professionaly done!
LikeLiked by 1 person
Thank you! I can’t wait to do something with it.
LikeLike
Such an interesting post and your skeleton leaves turned out beautifully! Thanks so much for sharing and for the inspiration 😁. Happy weekend! J 😊 x
LikeLiked by 1 person
Always happy to share and inspire. Thank you Jo, glad to hear from you. Happy all week long!
LikeLiked by 1 person
Those skeleton leaves are so incredibly pretty, I’ve always wanted to try it. In fact a few months back I put a whole bunch of leaves in water and then promptly forgot all about them. Unfortunately the water dried up and so did the leaves 😀 So I’m going to have to give it another shot after seeing how beautifully yours turned out Mel
LikeLiked by 1 person
Lol! Yes, you should give it another try, it is going to be beautiful, even more if you dye or paint it, and it’s going to be my next project 🙂 But beware of the smell, I wore mask 😀 Thank you Michelle, have a lovely weekend!
LikeLike
I’ve always thought skeleton leaves are very cool but I’ve never thought to try and make my own.
I’m interested in what kind of brush you used, would something like an old toothbrush work. If it gets smelly then something I could throw away afterwards might be a good idea!
LikeLike
Fun project! I think I’d be like the reader who forgot about her leaves, hahaha. Love the results, though 🙂 Thanks for sharing with us at Creatively Crafty #ccbg 🙂
LikeLiked by 1 person
😀 Thank you Lydia!
LikeLike
I love those. They’re beautiful for crafting. Thanks for the tips.
LikeLiked by 1 person
Thank you so much! Happy to share.
LikeLiked by 1 person
Cool idea! Thanks for sharing this. 🙂
LikeLiked by 1 person
Thank you so much!
LikeLike
Oh wow, they look so great, so easy to make and I love no chemicals. Thank you xoxo
LikeLiked by 1 person
Thank you to you too! It is so easy, and you don’t have to worry about chemicals that will affect health.
LikeLiked by 1 person
Could they be coated with mod podge to preserve them?
LikeLiked by 1 person
I never try it, but so far my skeleton leaves are fine for years. But you may try it to see how it goes. Thank you!
LikeLike
These are beautiful! Thank you for the step by step directions. Do you press them once they are finished decomposing? How do you get them nice and flat? -Marci @ Stone Cottage Adventures
LikeLiked by 1 person
Yes, I have explained it on my steps. Just lay them on pages of your book, thicker book is better of course. It’s fun to have them in many colors and the best part is you can use these skeleton leaves for any decorating purposes. Thank you so much for stopping by, Marci. Have a blast day!
LikeLike
Thank you! I enjoy Bible journaling and think these would be AMAZING on an illustration. -Marci @ Stone Cottage Adventures
LikeLike