
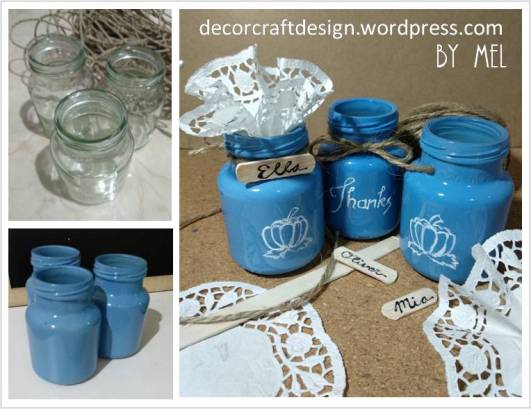
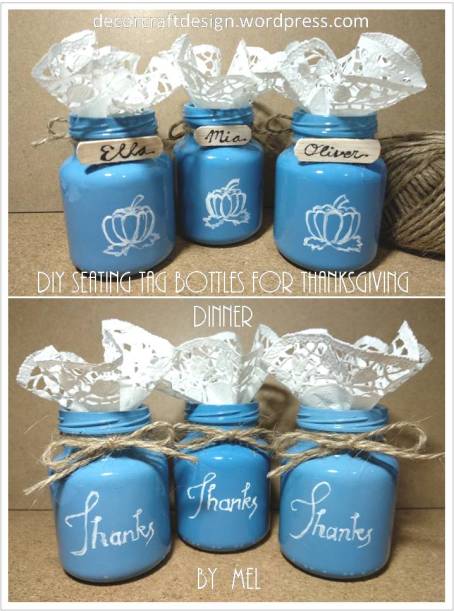
DIY Seating Tag Bottles For Thanksgiving Dinner
After I finished my grateful thanksgiving sign, I was inspired to make seating tag out of used mini bottles I had. With blue and white colors with natural touch of wood and rope. This upcycling bottles project would be a great functional decoration to complete your lovely thanksgiving dinner party.
What did I prepare for this seating Tag mini bottles :
- Mini glass bottles (Find any used mini bottles you can get from any drinks)
- Blue spray paint
- White Acrylic paint
- Paint Brush
- Organic rope
- Ice sticks
- Black ink pen
- Small doily paper
- Glue
- Scissors
These are steps I took to make the Thanksgiving tag:
- Clean the used bottles and dry it thoroughly.
- Spray paint the bottles with blue paint. Let it dry.
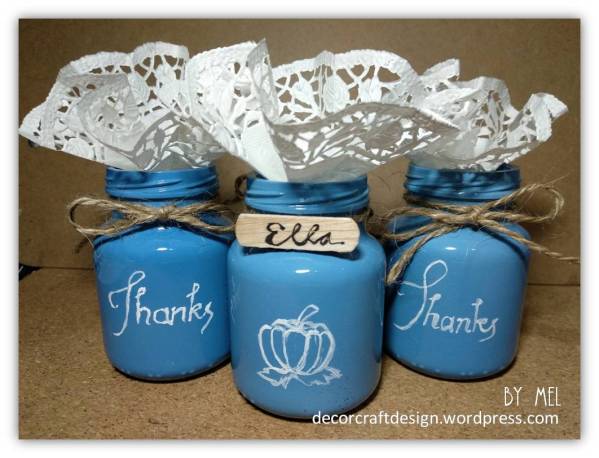
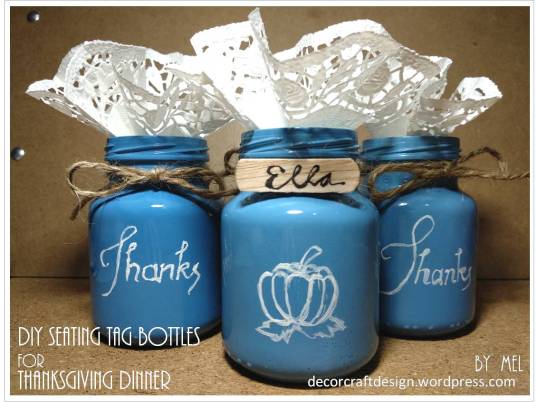
- Paint each bottle with pumpkin on one side and paint the word “Thanks” on the other side by using brush with white paint. Leave it dry. You can always do the easier way with stickers or decoupage to skip the hand painting job.
- Tie each bottle with organic rope to give an earthy feeling of fall season. The ribbon is on the “Thanks” side and the name tag on the pumpkin side.
- For the name tag, write down the name of your guest on the ice stick with a black ink pen and then cut the ice stick with beveled edges.
- Stick the ice stick name tag on the organic rope by the pumpkin side.
- Fold the doily paper and shape it into a flower. Slip each doily on top of each bottle.
- My seating tag is ready for the thanksgiving party! Easy DIY!
It turned out to be one of my favorite upcycling bottles project besides two of my other diy painted bottle projects ( Fall Leaves and Geometric Gold ). I love the color blue meets the white and the natural wood tag with organic rope ribbon; and of course the hand painted “Thanks” and pumpkin. And the amazing thing is, you can use this seating tag bottle as a souvenir to thank your guest too! How? Just fill up the mini bottles with some fine chocolates or sweets or even some potpourri. In that way, you have yourself a seating tag and souvenir in one bottle! Isn’t that great?! Nothing is wasted, but everything is pretty and everyone is happy!
See you all!
Be creative and thankful!
Mel
I entered challenges for my diy seating tag bottles on:
- Try It On Tuesday – Thankful
- Brown Sugar Challenge – Gratitude, kindness or thankfulness
- Use Your Stuff – Thank You
- Inkspirational –

- Stinkin’ Inkers – Just because
- International Art And Soul – Autumn Colours
- Dare 2 B Artzy – Thanks
- Rhedds Creative Spirit – Fall and winter
- Everybody Art Challenge – Tag
- Altered Eclectics – Anything goes

As always…such clever ideas!
LikeLiked by 1 person
Thank you! You’re very sweet 🙂
LikeLiked by 1 person
Love that blue color you use in your arts and crafts. These came out great. I need to start thinking of something handmade to go along with my store bought gifts, maybe I will do something with jars.
LikeLiked by 1 person
Thank you! I’ve been wanting to do something with the mini bottles I had, until now. I think I have more ideas with the mini bottles, I even have the smaller one from a supplement drink, super cute. Well, let’s be creative then 🙂
LikeLike
Fabulous jars – so pretty! Thank you for sharing it with us at Try it on Tuesdays.
Susi
LikeLiked by 1 person
Thank you Susi!
LikeLike
These will be so cute on your table and they look fabulous!
LikeLiked by 1 person
Thank you Robin! 🙂
LikeLiked by 1 person
A lovely project, the jars look so pretty and could be used for other occasions too
Thanks for joining us at Try It On Tuesday challenge
Joan
LikeLiked by 1 person
Thank you so much Joan!
LikeLike
Great idea! TFS it with BSChallenge~
LikeLiked by 1 person
Thank you!
LikeLike
Wonderful idea! Thanks for joining the Dare 2B Artzy Monthly Challenge! DT Member Pam
LikeLiked by 1 person
Thank you Pam!
LikeLike
SO cute! You come up with the best idea! Thanks!
LikeLiked by 1 person
Yes, I think so too…Thank you Diane!
LikeLiked by 1 person
A fantastic recycling idea, The name place pieces look super. Thank you for sharing with us at Try it on Tuesdays.
Yvonne
LikeLiked by 1 person
Thank you so much Yvonne! I love the little wooden name tag too. Thanks for visiting and happy weekend!
LikeLike
What a great project – thrifty and eye-catching. Thank you for joining us at Inkspirational Challenges.
LikeLiked by 1 person
Thank you Marina!
LikeLike
These are so lovely!
LikeLiked by 1 person
Thank you!
LikeLike
Gorgeous idea! Love the blue color 🙂 Thank you for entering our Challenge at Brown Sugar. Alina DT
LikeLiked by 1 person
Thank you Alina! Have a great week!
LikeLike
What a lovely idea! Thank you for linking to Rhedd’s Creative Spirit Challenge this month.
LikeLike
Lovely altered bottles. Pretty details. Thank you for joining us at Altered Eclectics this month. Hope to see you back here again soon. Judy DT
LikeLiked by 1 person
Thank you so much Judy! Happy week!
LikeLike
Fantastic idea! Thank you for joining us at TioT.
LikeLiked by 1 person
Thank you Marjut!
LikeLike
What a cute idea. These turned out darling. Thank you for sharing at Inspire Me Monday.
LikeLiked by 1 person
Thank you Amy!
LikeLike
These are so cute and I love the colors
LikeLiked by 1 person
Thank you so much Chas!
LikeLike
What a very clever and unique idea. Thanks for joining us at International Art & Soul. Good luck. Maggie DT
LikeLike
Visiting from #BloggersPitStop. These look so cute. I’m just not sure what I would do with them when they are done.
LikeLiked by 1 person
You can use them as seating tag and also as a party favor container for your guest to bring home. But if you only use them for seating tag on thanksgiving dinner party, later you can use them as mini container for maybe paper clips, bobby pins, etc. Thank you for stopping by!
LikeLike
These are lovely, the blue is great. This idea is easily adapted for any special occasion as well.
LikeLike
Beautiful! I love using place cards throughout the year, and I’m going to use this idea. #BloggersPitStop
LikeLiked by 1 person
Thank you so much Jean! So happy you would like to use my idea! Happy weekend!
LikeLike
A great idea and so pretty
LikeLiked by 1 person
Thank you Nicole! Happy weekend!
LikeLike
These are incredibly creative! I especially love the name tags~. Thank you for linking up with us again at Inkspirational!
LikeLike
cute – for any occasion!
LikeLike
Very creative Mel, they’re so pretty :D) Happy PPF!
LikeLike
Good👍
LikeLiked by 1 person
Thank you!
LikeLike
These are so cute..love the colour choice..
Thank you for sharing at Rhedd’s…
LikeLiked by 1 person
Thank you so much Sandra!
LikeLike
Cool project! I now want to paint some jars for the holidays! Thanks for participating in the Dare 2B Artzy November Challenge! -Tasha ☺
LikeLiked by 1 person
Thank you so much Tasha! So glad you want to make some yourself for holidays. Happy week!
LikeLike
Beautiful:)Thanks for playing with us at Brown Sugar Challenge:)Ines DT
LikeLiked by 1 person
Thank you Ines!
LikeLike
How pretty, love the color!! Thanks so much for linking up at #AThemedLinkup 4 for All Things Thanksgiving.
LikeLike
Thank you Dee!
LikeLike