
It’s a coloring supplies organizer that can be opened like a suitcase and standing like an open book. It would be a wonderful way to organize your coloring supplies and at the same tie you can bring it anywhere. I made the organizer from a cardboard box and some tissue rolls, so it’s a perfect upcycling project to be organized on this back to school occasion.
It’s an easy project and you would have a great time decorating the organizer box with your kids. Choose a theme to begin with and you are good to go with decorating. My theme is seaside. That is why I mixed the sandy color of the kraft paper and blue. Some seaside creatures as decoration elements are also included to make it merrier.

How to make the coloring supplies organizer for your kids?
- cardboard box
- Tissue rolls
- un-used mini cardbox ( I used an un-used food box with a rounded plastic opening)
- Kraft paper
- Blue paper=
- Seashells
- Bling starfish from hot glue
- Blue ribbon
- Rubber band
- White acrylic paint
- Brush pen
- Glue
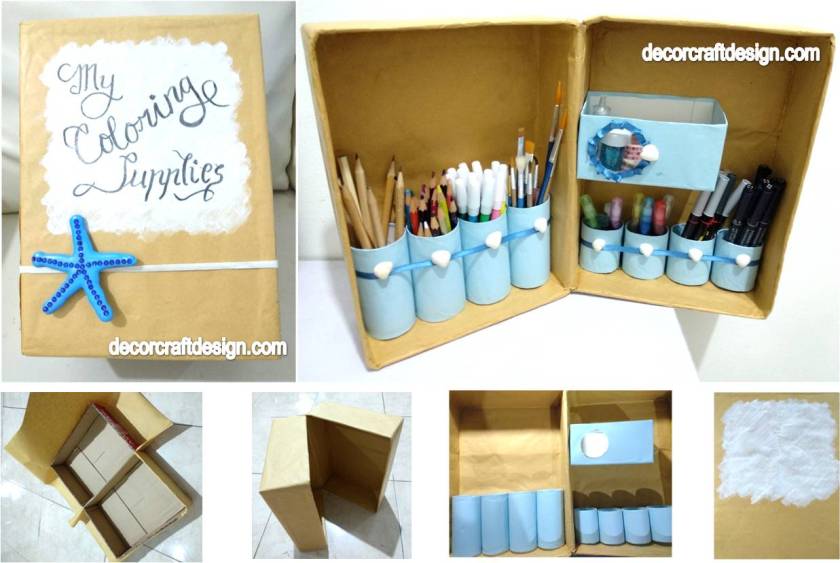
Now, these are the steps on how to make the coloring supplies organizer with upcycling cardboard boxes;
- Glue all openings on he cardboard box. Leave it dry.
- Cut the box into an open book.
- Wrap the entire box with kraft paper.
- Take 4 tissue rolls and cut 2 tissue rolls, each into two, so you have 4 standard tissue rolls and 4 smaller tissue rolls.
- Wrap all the tissue rolls with blue paper.
- Take the mini cadbox and also wrap it in blue paper, but leave the round opening.
- Glue all 8 tissue rolls and the cardbox to the cardboard box and leave it dry.
- Glue some blue ribbon to the tissue rolls and around the opening of the mini cardbox.
- Give some white small seashells to each tissue rolls and the opening of the mini cardbox.
- Paint the front organizer box with white acrylic paint effortless. Let it dry.
- Write the words “My Coloring Box” in a pretty way by using brush pen.
- Make a rubber band and use it to secure the organizer box.
- Add a bling starfish on the rubber band.
- Finished! Now you have all your coloring supplies at one place and you can bring it anywhere you go.

There’s no limit to decorate the coloring supplies organizer, you can have it in simple like mine or choose the more is more style, it’s all up to you and your kids to decide. It’s a cheap upcycling project anyway, so you can do it without too many preparation. This could be a good way of organizing your kid’s desk for back to school time. Happy organizing!

For more of my future Coastal Summer theme posts, please follow me! And if you wanted to add my creations to your Pinterest boards, please follow me on Pinterest! Also find me on Instagram and Twitter!
![]()

![]()
And for creative fellow bloggers, don’t forget to join “You’re The Star” Blog Hop ! Link your inspiring posts every Monday and get a change to be featured! Starting June 2019, I will be co-hosting the blog hop and would love to see you there! Join and share the news!

See you!
Organize with creativity!
Mel

Wow!! This is beautiful ♥️
So creative
LikeLiked by 1 person
Thank you so much Jyoti! Happy Sunday!
LikeLike
My pleasure Mel!! You too enjoy your Sunday ❤️
LikeLiked by 1 person
That’s a great idea and a creative one too. I would have loved that when I was a kid. I might staple a ribbon to the top for a handle – or maybe two, to keep the halves together. I love how this uses things you can easily find.
LikeLiked by 1 person
Yes, kids would love this! Thank you so much! Happy Sunday!
LikeLiked by 1 person
That is really cute!!
LikeLiked by 1 person
Thank you Tanya! Happy Sunday!
LikeLiked by 1 person
This is such a cute idea! I love how you can close up to save space or take it with you. This is perfect for road trips!
LikeLiked by 1 person
Thank you Michelle! Exactly! And you can even insert some papers or a sketch book inside to go along with the road trip. That would keep your kids happy! Happy Sunday!
LikeLiked by 1 person
Usually when I hear « back to school » I feel happy that I will see less kids in the streets 😂😂😂😂 (okay that was mean)
This is really creative and beautiful as usually dear Mel 😊 your kids are lucky, you can always entertain them 😊
Have a great Sunday 😊💕
LikeLiked by 1 person
LOL! For me, back to school means back to be tired parents 😀 Well, have to keep them happy in some way, but it has to be cheap, so must use creativity 🙂 Thank you Huguette! Have a blast Sunday! xo
LikeLiked by 1 person
Hahahah yes I know that from my married friends 😌
I believe if you’re clever you don’t need to pay a lot to have beautiful things 😊
My pleasure Mel 😊💕
LikeLiked by 1 person
Agree! 🙂
LikeLiked by 1 person
Very creative! I love it and am going to make one for myself!
LikeLiked by 1 person
Thank you Robin! Happy organizing!
LikeLiked by 1 person
I love this
LikeLiked by 1 person
Thank you! Glad you love it!
LikeLike
nice share
LikeLiked by 1 person
Thank you! Have a great Monday!
LikeLike
I love the coastal color! This will look pretty on my desk 😉😊 Great job Mel! Have a wonderful week! 😊🌸🌸
LikeLiked by 1 person
Thank you Ribana! Have a wonderful week to you too!
LikeLiked by 1 person
Wow, what a fabulous project! The containers are beautifully designed to hold all those materials and I love how it all closes away to keep everything neat and tidy too 😁. I hope you’ve had a good couple of weeks, I’ve been missing in action as I managed to bash my nose on a root handle which gave me two black eyes! The thing is I couldn’t wear my reading glasses and I can’t see with our them so no blogging for me …lol 😉. Feeling much better now though! Wishing you a wonderful new week! happy and creative wishes! Hugs, Jo x
LikeLiked by 1 person
So sorry to hear that, hope you’re back to normal very soon! Thank you so much Jo! Would be amazing if you make one for yourself with your beautiful artwork in front of the box! Have a wonderful week to you too! xo
LikeLiked by 1 person
So Cute! I might have to try this!
LikeLiked by 1 person
Thank you so much! Happy trying, Sara!
LikeLike
This is such a neat and creative project! My son’s pencils are always in this drawer, and that drawer…this project would be great for us. Thanks for sharing!
LikeLiked by 1 person
Yes, and you would have a good time with your son decorating it together! Thank you so much! Happy to share!
LikeLike
Thanks so much for linking up your post at the #WednesdayAIMLinkParty 43.
LikeLiked by 1 person
Thank you!
LikeLike
What a great little organizer for coloring supplies! Thanks for linking up at the #WednesdayAIMLinkParty 43 shared!
LikeLiked by 1 person
Thank you so much Sylvia!
LikeLike
What a great way to organize and recycle at the same time! Thanks for sharing with us at The Blogger’s Pit Stop!
LikeLike
Wow, that’s a great idea!!
LikeLiked by 1 person
Thank you so much!
LikeLiked by 1 person
I’ve been on your site today and I love your craft ideas. The “R” with the anchor was a great.
LikeLike