I was inspired to see many wreath creations was made of tissue rolls. You may want to make easy and cheap but beautiful looking wreath, as the the wreath is usually occasional, so you need to be thrifty with it. This summer I have coastal / nautical summer theme, that is why I made the upcycling tissue roll diy wreath with coastal theme too. It’s easy to make, simple steps and less materials.

What do you need to make this easy diy coastal wreath?
- Nine tissue rolls (white rolls are preferred, to get easy and better result in painting.
- Dark blue ribbon
- Light blue paint (blue mixed with white), Light grey paint (mixed black and white), Light turquoise paint (blue, green and white mixed). I used watercolor, it’s cheaper, but it stains a bit in your hands; so you can use acrylic and have no stain.
- Starfish
- Glue (White glue and hot glue)
- Stapler

How to make those tissue cores into a beautiful coastal style wreath? Allow me to share the five easy steps to diy the wreath:
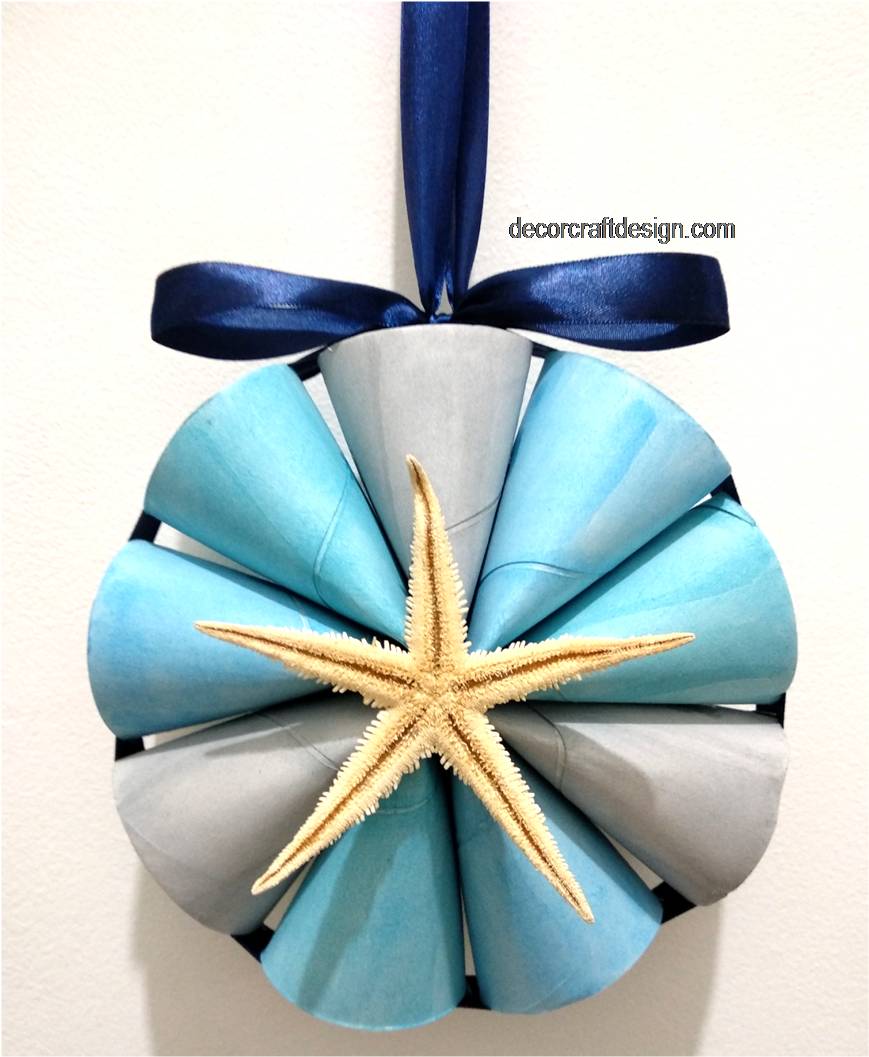
- Paint the nine tissue rolls into three colors, 3 rolls for light grey, 3 rolls for light blue and three rolls for light turquoise. These are the coastal colors. Let it dry
- Form each tissue roll into a cone and staple it. each cone to one another
- Glue each cone to one another until it form a circle with white glue. Secure the wreath with hot glue in the center.
- Glue a starfish in the center of the wreath the get the seaside look.
- Tie around the wreath with dark navy blue and tie a bow and use it as the wreath’s hanger. Finished!

Super easy isn’t? And a great way to make use of the tissue cores that I’m sure every household has it, a lot! Well enjoy the breezy coastal wreath that won’t cost you much and great diy wreath for summer nautical home decor theme. Put it in front of your beach home’s door and be proud of your re-purposing tissue rolls project!

For more of my future Nautical Summer theme posts, please follow me! And if you wanted to add my creations to your Pinterest boards, please follow me on Pinterest! Also find me on Instagram and Twitter!
![]()

![]()
And for creative fellow bloggers, don’t forget to join “You’re The Star” Blog Hop ! Link your inspiring posts every Monday and get a change to be featured! Starting June 2019, I will be co-hosting the blog hop and would love to see you there! Join and share the news!

See you!
Let’s get creative!
Mel

How clever! Who knew there were so many uses for tissue rolls?
LikeLiked by 1 person
So many even I still explore it! 🙂 Thanks Denise!
LikeLiked by 1 person
This is such a cool project and I’m going to have to save my tissue rolls now just so I can do this.
LikeLiked by 1 person
Yes, needs quite a lot of tissue rolls to make it :D, but it’s worth it. Thanks Alice, happy trying!
LikeLike
Wow, what a transformation! The contrasting colours with the starfish centre is fabulous 😁. Wishing you a wonderful week! Hugs, Jo x
LikeLiked by 2 people
Thank you Jo! Means a lot coming from you! 😆
LikeLiked by 1 person
Nice blog that I happened to come across.. Would love if you could check out some of my doodles.🌸
LikeLiked by 1 person
Thank you! Would love to visit you! 😄
LikeLiked by 1 person
That’s pretty, you’d never know what it was made of 🙂
LikeLiked by 1 person
Thank you so much Julie! I wanted it to look like trumpet shells 😀
LikeLike
This is so cute! Thanks for sharing with us at the Weekend Blog Hop at My Flagstaff Home! –Jennifer
LikeLiked by 1 person
Thank you Jennifer! 🙂
LikeLike
Thanks so much for linking up your post at the #WednesdayAIMLinkParty 42!
LikeLiked by 1 person
Thank you!
LikeLike